Saturday, January 28, 2023

A spicy dal, or a simple chili. Instant Pot. Inspired by Chef AJ

Super simple food, really, and delicious to boot.

Red Lentil Chili/Dal - Instant Pot

Inspired by Chef AJ, adapted from Instant Pot Recipe book

instantpotme.com


Ingredients

1 tbsp of panch puran

1 cup water with Yondu for the sauté

1 medium/small Onion, chopped

4 cloves of garlic

1-2 carrots, shredded or sliced thin

1 large red bell pepper

2-3 Thai chilis

1 Jalapeño

1 cup red lentils

4 cups water

2 tbsp apple cider vinegar

1 tbsp parsley flakes or fresh chopped parsley

1 tbsp oregano

1 tbsp salt-free chili powder

1 tsp smoked paprika

1 tsp chipotle powder (or more)

1 tsp crushed red pepper flakes to taste

1 tsp cumin, milled

1 tsp caraway, milled

1 tsp fennel, milled

1 piece of turmeric minced, or a tsp of turmeric powder

1 14.5 Oz can of diced tomato (fire roasted)

1 6 Oz can of salt-free tomato paste

Directions

1)

Set aside the tomatoes, red bell pepper.


2)

In a large soup pot, first roast the tablespoon of panch puran, then water sauté or dry sauté the onion, garlic, peppers until translucent, about 8-10 minutes.


3)

Add remaining ingredients but not the tomatoes, and bring to a boil.

Reduce heat to medium and cook until lentils are creamy, about 20 minutes.


4)

Blend the tomatoes, bell pepper and garlic in blender and blend until smooth. Skip this step if you like it chunky.


5)

a) Place all ingredients in an electric pressure cooker and cook on high for 10 minutes,

or b) place all ingredients in a slow cooker and cook on low for 8 hours.


Garnish with finely chopped scallions and a sprinkling of Faux Parmesan (or nutritional yeast).

Notes

Optionally, you can make this with more veggies, liek beet greens, chard, and other such. In that case, I left out the tomato puree.

I also made it more spicey and aromatic than the original from chef AJ, but by including veggies, it becomes more of a dal.

For offsetting the acidity of tomatoes, I prefer using a carrot over using dates or date sugar (which is really granulated dates, which still has the fiber in it, it is not refined, like sugar).

 

Monday, December 26, 2022

Black Chickpea Curry (Kala Chana Dal)

 A simple, nutritious dish.

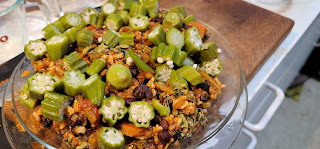
Here is a plate of: 
Brown Basmati, 
with Kala Chana Dal, and 
topped with some sun-dried Fenugreek leaves (Kasoori Methi), 
and Okra.

Simple, nutritious and delicious.


This is definitely one of these meals that you can vary endlessly. I provide the recipe hereby, with some suggestions of what you might change:

Ingredients

  • 1/2 Tsp cumin seeds, or 1 TSP Panch Puran
  • 1 cup onions, finely cut-up
  • 1-2 green chili, chopped or slit
  • 1 cup dry (Kala Chana), rinsed, and soaked 6-8 hours or overnight
  • 3/4 to 1 cup tomatoes, chopped or pureed - 2 medium 200 grams
  • 1-1/2 Tsp ginger/garlic paste, or 3 garlic cloves + 1/2" ginger, ground
  • optional: cut up stems (1/4") of kale or collard greens, cooked with the kala chana.
  • optional: one sliced carrot (to sweeten the tomato flavor)
  • 2 cups of water
  • 1/2 - 3/4 Tsp Garam Masala
  • 1/2 Tsp Red Chili Powder
  • 1/4 Tsp Turmeric Powder
  • 1-1/2 Tsp Coriander Powder
  • 1/2-1 Tsp salt (depending on your religion)

Preparation

  • Briefly roast the spices (cumin or panch puran), in a stainless steel skillet.
  • Add the onion and green chili, and chopped kale stems if using, and a 1/2 cup of water with Yondu. 
  • Sautée until soft.
  • Add the ginger and garlic, sautée for one minute
  • Pour 1 cup of tomato puree or chopped tomatoes
  • Sautée and stir for a minute
  • Add the Garam Masala and other spices. Sauté 2-3 minutes
  • Add the soaked Kala Chana and 2 cups of water
  • Pressure cook 35 mins (or 40 mins if beans are older).

Optionally after it is done you can add some methi leaves, and some sliced ginger.

The option of the kale or collard greens stems is superb, for this dish cooks a bit longer, and you use the pressure cooker, so those stems will be completely cooked, but the deepen the flavor of this dish and add a lot of nutrition.
For the tomatoes I used one 15 Oz package of crushed tomatoes and a small can (6 Oz) of tomato puree.
Optionally, you can precook the kala chana until they are just soft, even before putting them in the IP.

Monday, November 28, 2022

Spicy Karela (Bitter Melon) Side Dish


Chinese Bitter Melon Recipe

Side Dish, probably, but who am I to quibble if you want to make it a main dish and if you want to make it #WFPB style, just leave out the oil and instead stir-fry some finely cut-up onion in 1/2 cup of water  water, and at the end, if you want to serve this over rice, I would add a 1/2 cup of water with 1/2 tsp arrowroot dissolved, and you would have some kind of a spicy karela sauce. You can serve that over rice. I even did this for breakfast once - that'll wake you up.

In general, I am finding that when oil seems essential, you can always caramelize some onions in water first. In this case, you would actually first stirfry the Sichuan peppercorns, then discard them, as shown on the video and add the finely cut-up onions into the peppery water, 

PRINTABLE RECIPE - https://soupeduprecipes.com/garlic-st... INGREDIENTS 500 grams of bitter melon 1 tsp of salt to reduce the bitter taste 6-8 pieces of dried red chilies 3-4 pieces of fresh red chilies 1 tsp of salt to rub the bitter melon 3-5 cloves of garlic 1 small onion cut-up fine
1 cup of water with Yondu 1 tsp of Sichuan peppercorn optional: 1/4 cup of water with 1/2 tsp arrowroot (or other starch)
Salt to taste, but not needed if using Yondu.

Directions

* Cut the bitter melon in half, then quarter it. Remove the white spongy inside part. You can use a rounded teaspoon (or a grapefruit spoon with serrated edges) to scrape the last bits of the white part.

* Cut it with a 45-degree angle into 1/3 of an inch thick slices. Season it with 1 tsp of salt. Rub for a few minutes. Let it sit for 15 minutes.

* Cut some red, dried chilies open and remove the seeds.

* Roughly dice some fresh red chilies

* Press 5 cloves of garlic through a garlic presser.

* Optionally, prepare 1 tsp of Sichuan peppercorns.

* Now go back and check out the bitter melon. Squeeze out as much moisture as you can.

* Rinse the bitter melon with cold running water several times. Drain it but doesn’t need to be thorough, for you need some water anyway.

* Stir-fry the Sichuan peppercorns in 1/4 cup of the water with Yondu.

* Once you see the color of the peppercorns is getting dark, you can take them out and discard them.

* Next, stir-fry the onions with 1/2 cup of water with Yondu.

*Turn the heat to medium. Add in the bitter melon, dried chili, fresh chili, and garlic. Stir for a couple of minutes.

* Turn the heat to low. As the temperature climbs up slowly, the water will be seasoned with the peppercorn flavor and the onions.

* Give it a taste. The Yondu makes the taste, you can adjust with more Yondu or a small amount of Bragg's Liquid Aminos. Add the 1/4 cup of water with starch. The salt in the Yondu or the Liquid Aminos will suppress a little bit of the bitter taste, the starch will make the sauce. 

* Give it a final stir and you are done.


Wednesday, November 16, 2022

Pad Thai in a Hurry, with Cauliflower

 The other day, coming home from a tiresome journey, I needed a meal to pick me up, but I had no energy for any big production, and here the conveniences of a smart pantry came to the rescue.

On the way home I had picked up a beautiful head of Fioretto cauliflower, and I remembered that I still

had some Annie Chun's Brown Rice Pad Thai noodles, and some Maesri Thai Red Curry Paste, as well as a package of frozen Goya Fajita Mix, as well as a king mushroom. With the help of some onions and garlic, a deliciously refreshing and spicy meal was quickly ready.
Usually, I regard meal prep as a necessary part of therapy, it is a wonderful way of communing with nature on the 4th floor in the Bronx, and looking out on a side street.

But there are times when convenience counts, and 

you can still have a healthy meal, so here we go:


Ingredients:

  • 1 onion
  • 3-6 cloves of garlic
  • 1 king mushroom
  • 1 cup water
  • 1 can of Thai Curry
  • 1 bag of Fajita Mix
  • 1 TBSP of arrowroot (or other starch)
  • Brown Rice Pad Thai noodles.

Preparation:

  • Soak the Pad Thai noodles in hot water for 10 mins, rinse cold and set aside.
  • Cut up the onion fine.
  • Mince the garlic
  • Cut up the king mushroom in strips (I use a mandoline)
  • Stir-fry in the water for a while
  • Add the curry paste
  • Cut up the Cauliflower in florets
  • Add to the mix and let it cook on medium flame for 2 minutes
  • Add the Fajita Mix, and cook until soft, turn down the heat to just a simmer
  • mix the starch with a 1/4 cup of cold water, and add to the mix.
  • At the end add in the noodles and let them warm up.
Serve. Enjoy.

Evidently you could use different mushrooms, or you can add in a handful of fresh peanuts if you have them, and depending if you permit yourself some nuts, which tends to be a hot topic in plant-based circles. Evidently, if you are a serious heart patient, follow Dr. Esselstyn and avoid nuts and seeds, avocado and coconut, because of the oil content. You get all the fat you need from beans, etc.

Tuesday, August 30, 2022

A final word on Dr. Esselstyn's Black Bean Salsa

 Jose, who works at the Premium Halal Supermarket on the corner of Starling Avenue and Odell Street, has become my official taste tester for any Mexican-style dishes I try my hand at. Recently that was Cactus salad (approved), and lately I have been perfecting Dr. Esselstyn's Black Bean Salsa (From the book How to Prevent and Reverse Heart Disease). First time I gave it to him, I had forgotten the cilantro (pics), but yesterday I gave it to him with the cilantro, which was definitely better, but I am also fine tuning the number and blend of peppers that go into it. Recipe follows. 

By the way, while we're at it, there is an excellent site to research peppers, called Pepperscale.

I now like to use the following in my Black Bean Salsa:

Now for the updated recipe:

  • 2 cans of black beans, or 1 lb dry beans (cooked with some kombu in the pressure cooker or Instant Pot).
  • 1 can of corn
  • 3 stalks of celery, sliced paper thin
  • 2-3 Jalapeños, finely sliced
  • 2 Serranos, finely sliced
  • 1 Chilaca or Poblano pepper, sliced fine
  • 1 bunch of cilantro finely chopped
  • 1 bottle of Salsa Verde
  • 2-3 limes, juiced 

Clean all the ingredients, and slice the peppers fine, paper thin is the ideal. The celery also, paper thin is best (use the mandoline). I use all of the cilantro and again, just try to millimeter is. Now you'll understand why I love sharp knives. The finer you cut these things, the more the flavor spreads throughout. The secret to success here is the balance between aroma and heat.

As a practical matter, if you first pour the Salsa over the mixture, then you can wash out the bottle with the lime juice to get all of the salsa out. 

I prefer to let it marinate in the fridge for a day, and you can keep it for 4-5 days. You can serve it on tostadas, or rice cakes, or masa tortillas.


Wednesday, June 22, 2022

Start of Summer at Neerob & Honoring Sal - #WFPB style.

Sal, Salvatore Falzetta ("Mr. Hairstyling from Italy"), was the man of the hour yesterday at our small celebratory #WFPB (Whole Foods, Plant-Based) dinner, to celebrate the start of summer but also to honor Sal, who is the most famous barber in the neighborhood. He now practices at Silver Star Salon at 1470 Unionport Avenue, around the corner from Neerob Restaurant, where we had our dinner.

This was a recent picture of Sal, reading the paper between clients at Silver Star. Sal started cutting my hair fourteen years ago, and upon listening to my lengthy explanation of how I wanted it, including hand gestures, he rolled his eyes, and said: "I got it. Notta too long, notta too short." That was the one and only time we talked about hair.

Our dinner on June 21st was a proper Italian dinner with a small Bangladeshi flourish.

The appetizer was Capellini Pesto, with Rogier's Green Pasta Sauce, as per the recipe I recently posted here, and followed by a Spaghetti alla Puttanesca, along with a wonderful Arugula salad and Mixed Vegetables (Broccoli and carrots) as well as a Dal with spinach, and some whole wheat naan bread. Naturally, for the appetizer we used whole wheat angel hair pasta (Ronzoni), and for the main course we used Luigi Vitelli Whole Wheat Pasta. Desert was fresh strawberries with a drizzle of a 50/50 mix of Balsamic glaze and Balsamic vinegar.

As a practical matter, for the Puttanesca sauce, I used this Kelp this time instead of the hijiki and wakame that are listed in the recipe, which also worked just fine. I soaked it and cut it up, and, along with the capers and the kalamata olives, it provides all the flavoring that anchovies otherwise would in a traditional style recipe. 

The whole project was a collaboration with Neerob Restaurant, I cooked the Pesto Sauce, and Red Sauce - and the Restaurant, made the salads, the vegetable sides and the dal, and put the whole thing together.

One of Sal's loyal clients, my friend Ed Kremer, presented Sal with a Honor Certificate to celebrate his achievements. Sal came to the USA from Italy in 1958, form Cosenza, Reggio Calabria, and he's been a barber in the Starling Avenue neighborhood for 50 years. (The certificate said 1963 by mistake, but it was 1958).

We had mostly clients of Sal, and a few of my friends from other parts of town, and the result was a wonderful mix of people, and lots of interesting discussions.

Sunday, May 8, 2022

Time for #WFPB Pasta Puttanesca

Supposedly, you cannot make Pasta Puttanesca without anchovies, but this story proves otherwise.

I was famous among friends for my pasta marinara with mushrooms as a teenager. I figured it was because none of my friends liked to cook but they did like to eat. Be that as it may. At that time I discovered the natural way of countering the acidity of the tomatoes by adding in a julienned carrot (or two) to the recipe. The sweetness of the carrots deepens the flavor of the sauce and buffers the acidity of the tomatoes.


Anyway, I seem to be having a new Italian period in my cooking, just when I was starting to get excited about Mexican food. I will get back to the Mexican cuisine, and for now I am going wild with my Italian Renaissance on Starling Avenue in the Bronx. 

The other day, a Chinese friend stopped by for dinner, but gave me only a half our notice, and normally it takes 2 hours lead time to get Neerob to do a #WFPB meal. So we met at Neerob Restaurant and Shamim improvised a delicious soup, and for the main course, we had Rogier's Green Pasta, for I had just cooked a batch of my green sauce, and I brought it, a box of cherry tomatoes, and some angel hair pasta, and Neerob served that for the main course. The owner, Khokon tried it and loved it, and one of the other diners also sampled some of it and loved it too!

So here comes the next Italian dish, #WFPB style.

Ingredients

1-2 red onion and optionally a few shallots
4-8 cloves garlic, smashed
1 carrot julienned
1 bell pepper, or preferably a mix of some green, red and yellow or orange pepper.
1 pinch of hijiki and 1 pinch of wakame, rinsed
1 cup water with yondu
1 tsp Italian Herbs
1 (28-oz.) can diced tomatoes
optional a 12 Oz box of Cherry tomatoes.
1/2 cup kalamata olives, pitted, sliced and/or some other sliced black olives
1/4 cup capers
1/2 tsp crushed red pepper flakes

Optional topping: some basil leaves and some vegan parmesan.
You can have veggies on the side, zucchini, egg plant, spinach, broccoli, steamed carrots, whatever tickles your fancy.


Preparation

Note: Best cooked in a skillet to help with the evaporation of the liquid.

* Cut up the onions fine.
* Smash the garlic and cut it up fine.
* Julienne one or two carrots
* Cut up the peppers, I used a quarter green, a quarter red, a quarter yellow and a quarter orange pepper.
* Briefly roast the onions with the peppers and garlic and then add the water with Yondu.
* Add in the crushed red pepper flakes.
* Once the onions are caramelized, add in the olives, the capers, and the Italian herbs, the hijiki and wakame, and then add the tomatoes. Note: you can splurge on the olives and the capers to make up for skipping the anchovies, and the pinch of hijiki and wakame imparts a bit of "sea flavor," and in general depth to the flavoring of the sauce.
* Let the whole thing simmer until some of the moisture has evaporated and you have a sauce with some substance to it.

Serve over spaghetti, or linguini, or whatever shape pasta you happen to like.